

Table of Contents
The Importance of Regular Appliance Maintenance
1. Clean the Refrigerator Condenser Coils
2. Clean the Dishwasher Filter
3. Clean Out the Clothes Washer Drain Pump Filter
4. Replace the AC or Furnace Air Filter
5. Clean the Oven
6. Clean the Dryer Exhaust Vent Duct System
7. Replace the Refrigerator Water Filter
Conclusion
7 Appliance Maintenance Tasks that You Shouldn’t Neglect

Regular appliance maintenance is essential to ensure your appliances run smoothly and efficiently. By dedicating a bit of time to these simple tasks, you can extend the lifespan of your appliances and avoid costly repairs. This article covers seven crucial maintenance tasks that you shouldn't overlook. We'll cover everything from cleaning your fridge's coils to changing out your AC or furnace filters, and even provide some handy oven cleaning tips. So, let's delve in and find out why appliance upkeep is so important.
KEY TAKEAWAYS
- Appliance maintenance is essential to help keep your home running smoothly and efficiently.
- Neglecting appliance care and maintenance can result in unexpected breakdowns, reduced performance, and higher energy bills.
- In this article, we cover the 7 most important appliance maintenance tasks that you should never neglect.
The Importance of Regular Appliance Maintenance
Keeping your appliances in top shape requires regular maintenance, which helps avoid unnecessary expenses. Proper care can extend the lifespan of your appliances, improve their energy efficiency, and prevent costly repairs.
One of the main advantages of regular appliance care and maintenance is prolonging the life of your appliances. Like any mechanical system, appliances need proper care and attention to function optimally. Routine maintenance tasks, such as cleaning filters, lubricating moving parts, and checking for signs of wear and tear, can ensure your appliances serve you well for many years.
Additionally, regular maintenance enhances the energy efficiency of your appliances. Over time, dirt and debris can accumulate, components can wear out, and settings can become misaligned, leading to decreased efficiency. By regularly cleaning and tuning up your appliances, you can ensure they operate at peak efficiency, which reduces energy consumption and saves money on utility bills.
Moreover, regular maintenance can help prevent costly repairs. Addressing minor issues early on prevents them from escalating into major problems that require expensive repairs or even replacement. For example, routinely cleaning the lint trap in your dryer can prevent lint buildup, which can cause overheating and potential fire hazards.
In summary, regular appliance maintenance is vital for maximizing the lifespan of your appliances, improving energy efficiency, and avoiding expensive repairs. By investing a little time and effort in maintaining your appliances, you can enjoy reliable performance and save money in the long run.
1. Clean the Refrigerator Condenser Coils
The condenser coils at the bottom of the refrigerator collect dust during normal use. When dust coats the condenser coils, the coils can't release heat into the surrounding air, so the refrigerator has to work harder to stay cold. The result is decreased efficiency and poor cooling performance in the refrigerator. Don’t neglect this important maintenance task.
The coils get dirty because the refrigerator pulls in air from the surrounding environment, which contains dust, pet hair, and other particles that accumulate on the coils. Additionally, in kitchens with heavy cooking or baking activities, grease and food particles can also settle on the coils. Clean the coils at least twice a year—more often if you have pets that shed.
Follow these steps to clean the condenser coils in your fridge.
- Unplug the refrigerator or shut off its house circuit breaker to disconnect electrical power.
- To access the condenser coils, remove the bottom front toe grill. On many refrigerator models, you can pull the grill straight out and off of the refrigerator. Check your owner's manual for instructions for removing the front toe grill on your refrigerator. If the coils are under the refrigerator, remove the toe grill to access the coils. Some refrigerators have the coils on the back instead of below. Pull the refrigerator away from the wall to reach the coils on the back.
- Carefully push a coil brush into the condenser coils under the refrigerator. The coil brush knocks the dust off of the condenser coils. Vacuum the area to pick up the dust. After knocking the dust from the coils with a coil brush, vacuum the dust. After vacuuming the condenser coil area, move the refrigerator and vacuum the area under the fridge to remove all dust and debris.
- Reassemble the fridge and plug it back in or reset the house circuit breaker to restore electrical power.
- Move the refrigerator back into place.
Here’s a DIY YouTube video that shows more details on cleaning the condenser coils in common refrigerators.
If you’re apprehensive about cleaning the condenser coils in your fridge, schedule refrigerator maintenance service and a Sears Appliance Repair Technician will visit your home and clean the condenser coils for you. The tech will also clean, check and maintain all other parts of the refrigerator during the maintenance service visit.
2. Clean the Dishwasher Filter
Most dishwashers have debris filters in the bottom of the tub. Failing to clean these filters regularly can cause dingy and unsanitary dishes. You may also notice awful smells coming from your dishwasher when you open the door.
Don’t forget to clean the dishwasher filters at least twice a year – more often if your owner’s manual recommends it. Follow the instructions in the owner’s manual for your dishwasher to pull out and clean the filters in your model.
Here are the steps to follow to clean the filter in many dishwasher models:
- Locate the filter, usually at the bottom of the dishwasher beneath the lower spray arm.
- Remove the filter by unscrewing or lifting it, depending on the model. Be careful not to damage the filter or surrounding parts.
- Rinse the filter under warm running water to remove visible debris. Use a soft brush or toothbrush to gently scrub away stubborn residues.
- Check the filter for damage, such as cracks or tears. Replace it if necessary to maintain optimal performance.
- Reinsert the clean filter into the dishwasher, ensuring it is properly positioned.
- Run a short rinse cycle to flush out any remaining debris and ensure the filter works effectively.
3. Clean Out the Clothes Washer Drain Pump Filter
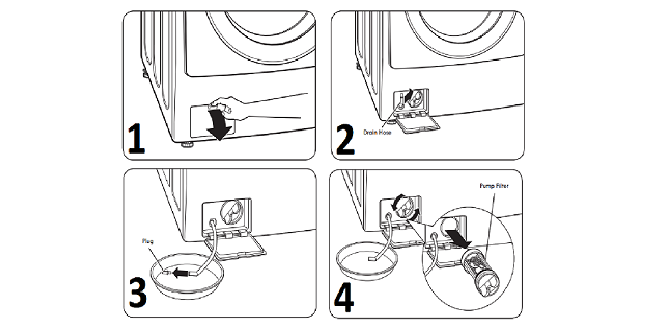
Many front-load washers have a drain pump filter tucked behind a small access door at the bottom, left corner of the front panel. Failing to clean that drain pump filter can prevent your washer from draining properly and foul smells can build up inside the washer.
To clean the drain pump filter, follow these steps:
- Open the drain pump filter access panel.
- Unclip the drain hose and pull it out. Place the end of the drain hose into a shallow pan or a floor drain. Make sure not to pull the hose out too far, or it may not drain properly.
- Remove the plug from the drain hose, and allow the water to drain completely. If there is a large amount of water in the drum, you may have to empty your container several times.
- Twist the pump filter counterclockwise to remove. Remove any lint and foreign objects from the pump filter. Insert pump filter back into opening and twist clockwise to secure. Insert the plug in the drain hose and reclip the hose. Be sure to close the drain pump filter access panel.
The image below illustrates the steps for cleaning out the drain pump filter.
You should also check the end of the washer drain hose and clear any debris clogging the end of that hose.
By regularly clearing out the drain pump filter, you can maintain the efficiency and longevity of your washing machine, saving you from unnecessary washer repairs and replacements.
4. Replace the AC or Furnace Air Filter
Air filters are vital for maintaining your HVAC system's efficiency and performance. They trap dust, pollen, pet dander, and other airborne particles, keeping the air clean. Neglecting to replace air filters regularly can lead to poor indoor air quality and put additional strain on your AC or furnace.
How often you should replace your air filters depends on factors like the type of filter, the number of occupants, and the presence of pets. Generally, it's recommended to replace air filters every 1 to 3 months. If you have pets or allergies, more frequent replacement may be necessary.
Follow the manufacturer's instructions when replacing air filters. Turn off your HVAC system before replacing the filter. Most filters are located in the return air duct or near the air handler unit. Remove the old filter and replace it with a new one matching the size and type specified by the manufacturer.
Choosing the right filter is essential. Consider factors like filtration level, airflow restriction, and budget. If unsure which filter to choose, consult an HVAC repair professional for guidance.
5. Clean the Oven
Grease build-up and spills inside the oven cavity can cause awful smells when cooking. The fumes can irritate family members or house guests that have allergies or breathing problems. Oven smoke can also irritate birds and pets in your home.
Cleaning your oven is relatively easy when your model has a Self-Clean mode. Just follow the directions in your owner’s manual for preparing the oven and your home for the process. Protect pets and family members with breathing problems before starting the self-cleaning mode because smoke will typically billow out of the oven vent during the oven cleaning session. After running the Self-Clean mode, you’ll simply need to wipe ash from the bottom of the oven and you’re done.
Follow a regular cleaning schedule. The frequency depends on usage and cooking type. Generally, a thorough cleaning every three to six months is sufficient for most households. If you notice excessive grease or food buildup, clean your oven more frequently.
6. Clean the Dryer Exhaust Vent Duct System
Neglecting to clean the dryer exhaust vent duct system going to the outside of your home can cause lint and debris clogs. Your dryer will take longer to dry clothes. Additionally, clothes that is tumbling inside the dryer also can overheat when the vent system is clogged.
Clean the dryer exhaust vent duct system at least twice a year or when you notice the dryer overheating and clothes taking a long time to dry.
Follow these steps to clear lint and debris out of the dryer vent duct system:
- Check the dryer damper vent on the outside of your home. Clear any obstructions that are blocking the damper from opening properly. Clean the damper vent and make sure that it swings freely on its hinge so that exhaust air flows freely out of your home.
- Disconnect the flexible exhaust duct from its wall connection. Vacuum lint and dust from the exhaust duct going to the outside of your home. You can also use a lint brush or leaf blower to help clear lint and debris from the exhaust duct system.
- Disconnect the flexible exhaust duct from the dryer and vacuum out the inside of the flexible exhaust duct.
- Vacuum lint and debris from the exhaust outlet on the dryer. Reassemble the flexible exhaust duct to restore the air path going to the outside of your home.
- Remove the lint screen and wash it with water and soft bristle brush to remove fabric softener and dryer sheet residue that builds up on the lint screen. Let the lint screen dry completely and reinstall it in the dryer.
If cleaning the dryer vent duct system isn’t a task that you can do on your own, schedule Dryer Vent Cleaning by Sears Home Services. We’ll send a professional duct cleaner to your home to clear out your dryer vent.

7. Replace the Refrigerator Water Filter
Continuing to use an expired water filter for a couple of weeks won’t have any significant effect on water quality or safety. Refrigerator water filters have the capacity to effectively filter water slightly beyond their rated capacity. Reasonable leeway in safe and effective filtering is expected for fridge water filters.
Don’t keep using a refrigerator water filter more than a few weeks past its expiration. Several weeks after its expiration, a refrigerator water filter can begin losing its ability to safely and effectively reduce water contaminants.
Eventually, the filter can get clogged and reduce water flow through the refrigerator.
Replace your water filter every 6 months or as directed by the owner’s manual for your fridge. If your fridge has an air filter, replace that filter at the same time that you replace the water filter.
Conclusion
Regular appliance maintenance is essential for keeping your appliances running smoothly and efficiently. By performing these seven tasks—cleaning refrigerator condenser coils, dishwasher filter, clothes washer drain pump filter, replacing AC or furnace air filters, cleaning the oven, vacuuming the dryer lint trap and vent, and descaling your coffee maker—you can extend the lifespan of your appliances, improve their performance, and avoid costly repairs.
Investing time and effort in maintaining your appliances ensures their reliable performance and saves you money in the long run. Don't neglect these essential maintenance tasks and enjoy the benefits of well-maintained appliances. Remember, refrigerator care and maintenance, along with other appliance maintenance, is key to a well-functioning home.
Schedule kitchen appliance maintenance now!
Regular kitchen appliance maintenance can help prevent costly breakdowns, reduce energy costs and extend the life of your appliances. We'll help you keep your refrigerator, dishwasher and range in top shape.
Was this information helpful?
Schedule kitchen appliance maintenance now!
Maintain Kitchen Appliances Resources

Learn how surge protectors work to protect electronics from power surges. Discover types, installation tips, and why surge protection matters for your home’s valuable devices.

Want to cut your water bill and help the environment? Discover 4 practical tips to reduce water usage in your household appliances, including washing machines, dishwashers, and refrigerators.

Enhance your kitchen safety game with essential tips to prevent accidents and maintain a healthy cooking environment.

Discover the best steps to safely assess and clean up your home after a hurricane, from checking for damage to inspecting appliances and systems.
Glossary Terms
Wattage is the measure of electrical power expressed in watts (W), indicating the rate at which a device consumes energy.
Natural gas is a fossil fuel used primarily for heating, cooking, and electricity generation. It's a hydrocarbon gas mixture consisting mainly of methane, but it also contains smaller amounts of other hydrocarbons and sometimes sulfur compounds.
A washer screw is a fastening device that combines a screw and a washer, designed to distribute the load of a screwed fastening more evenly and to prevent the screw from loosening under vibration.
A voltage meter, commonly referred to as a voltmeter, is an instrument used for measuring the electrical potential difference, or voltage, between two points in an electrical or electronic circuit.
Common Appliance Symptoms
The most common reasons your Whirlpool washer won't stop filling are a clogged water valve, a bad water-level pressure switch, or a malfunctioning electronic control board.
The most common reasons your Whirlpool washer won't spin or drain are a seized gearcase, a broken motor, or a failed door switch.
The most common reasons your Whirlpool washer won't turn off are a malfunctioning electronic control board, broken motor or a jammed door lock assembly.
The most common reasons your Whirlpool washer won't start cycle are a malfunctioning electronic control board, jammed door lock assembly or a faulty user interface.
The most common reasons your Whirlpool washer vibrates are a damaged suspension rod, malfunctioning electronic control board or a dead fan.
The most common reasons your Whirlpool washer is experiencing the rinse cycle not working are a broken lid switch, a bad water-level pressure switch, or a malfunctioning electronic control board.